Many mobile apps are digital reflection of real world services like taxi, delivery, all types of tickets, booking services, loyalty programs etc. Speaking of the last two, we usually install separate app for each service. But when we only need to quickly use our card or ticket, searching and opening an app may become inconvenient. That's where Wallet comes in. In this article I'm going to explain what a Wallet is, and how we can create and distribute cards for Wallet.
So what is Wallet? It allows you to keep various kinds of cards (tickets, discount cards, etc.) in your phone, making life easier for its users. Moreover, it is possible to update information about the card through push-notifications, but this is a topic for a separate article. But if you have a card or ticket that can be integrated into your phone, there is a solution for that!
Distribution
One of the most popular questions about Wallet is how we can distribute cards. We can do it in multiple ways:
- Add it from application
- Download it from website
- Sharing
Cards for Wallet are just files so we can share them like every other file via email, messenger or AirDrop.
Workflow
As I mentioned above, a card is just a file. It contains information regarding this concrete card. So if we have 10 mil users we should create 10 mil cards and store them somewhere? No. Cards should be created on demand. If we have a train tickets app we are creating a card only when the user presses ‘Add to Wallet’ button and that’s it. Good news for iOS developers: creating a card is always handled by server (correct me in comments if you have different cases). Good news for backend developers: there are lots of open-source solutions for creating these cards. So the workflow should be like this: client requests a card. Server creates it using required user info. Client downloads a card. By client I mean mobile app, webpage or newsletter service. So we know how we can deal with all these cards but how should we create them?
Card structure
From a developer’s point of view a card is an archive with the .pkpass extension. It contains all the data needed to display and operate the card. The contents of the archive are given in the table below.

There are the following types of cards:
- Boarding ticket: for a plane or train. Usually, the coupon works for one trip;
- Coupon: for coupons and special offers;
- Event ticket: can work for a single event or for an entire season;
- Discount card: Loyalty cards, discount or gift cards;
- General card type: If none of the above fits: for example, a metro card or a gym pass.
Let us consider schematically the appearance of different cards. It is better to name the images as they are shown in the table above.
Boarding ticket

Coupon
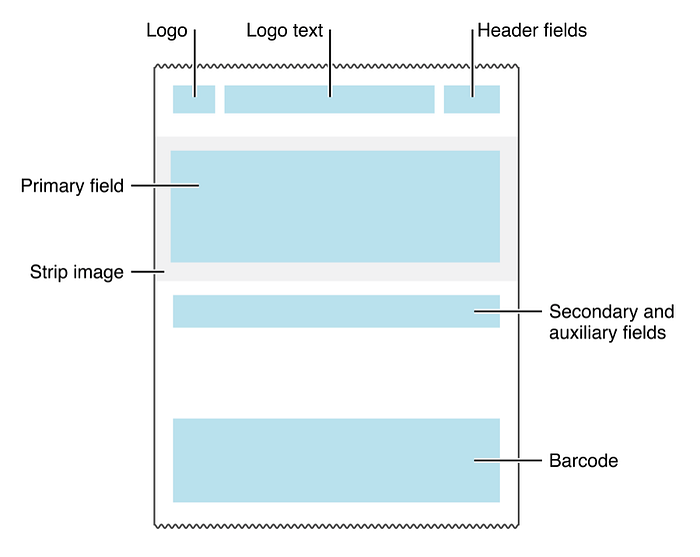
Event ticket
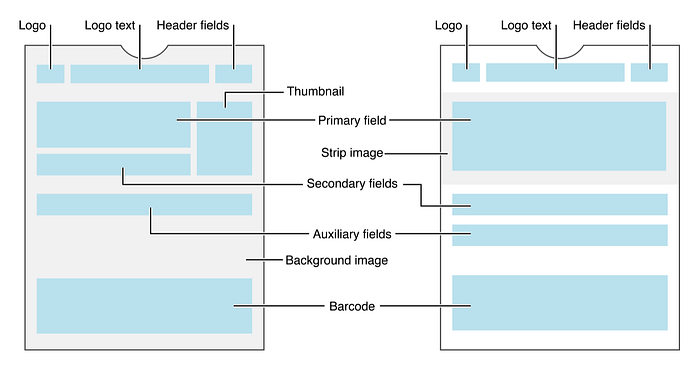
General card
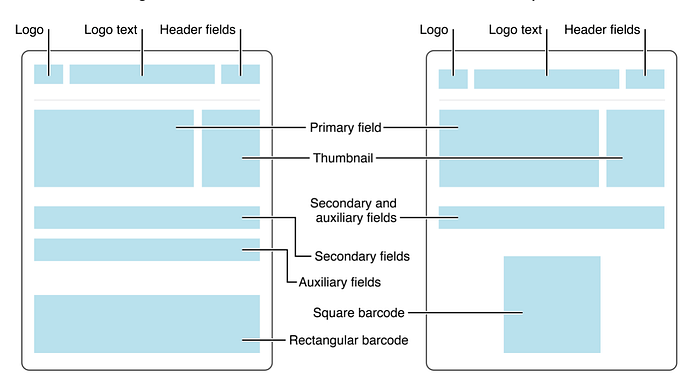
Discount card
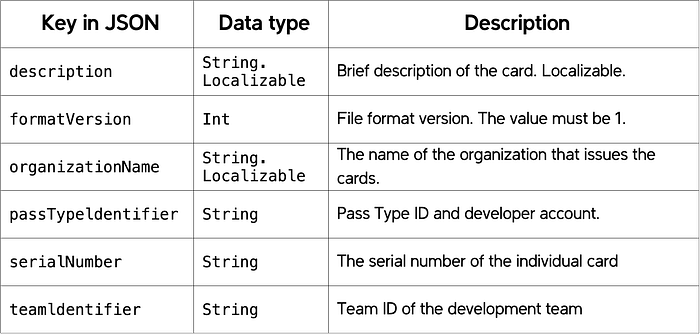
Pass.json structure
Required fields. Contains Pass Type ID, Team ID, organization name, etc. Keys for related applications. They are used to display applications that need to be “associated” with the card.
The “expiration date” keys of the card.
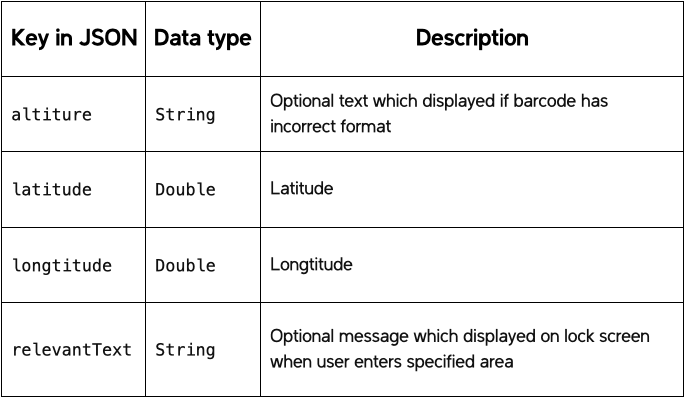
Relevance keys. For example, the coordinates of the area where the card can be used, or the start of the event for which it is intended.
Style key. At the beginning of the article, the 5 types of cards for Wallet were listed. Each one has its own style. There must be strictly one such key.
Keys for the visual design of the card. In addition to the obvious data, they contain information about the barcode displayed on the card.
Keys of web services. You can use web services to interact with the card, for example, automatically update it.
NFC keys. Contains additional information for the Apple Pay transaction.
Now, I’ll give you more details.
Required fields
Keys for associated applications

Style keys
JSON in this case has the following form:
“key” : “value1”,“label” : “value2”,“value” : “value3”
The value of the value key can be either numeric or string. However, you can’t use the currencyCode together with the string value. Several auxiliaryFields and secondaryFields can be available — we recommend to control the length of the lines that are used in them.
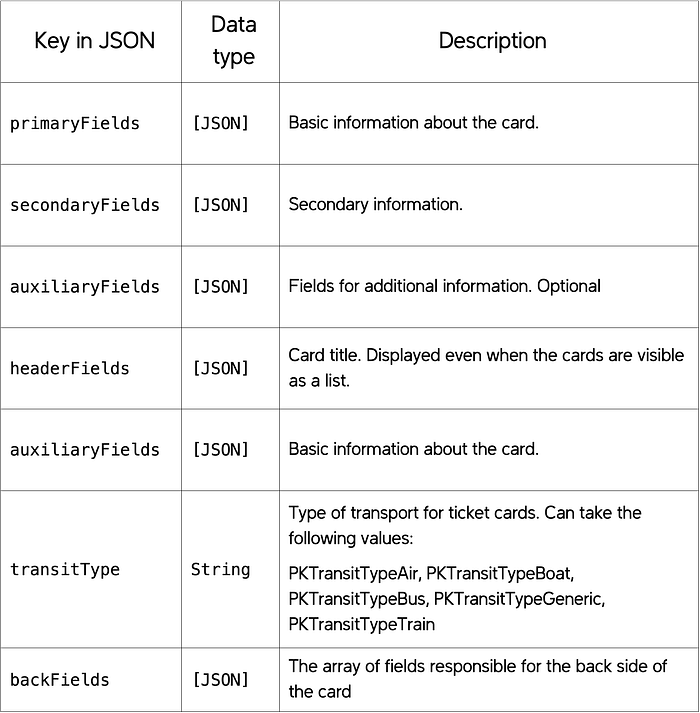
Visual designer keys
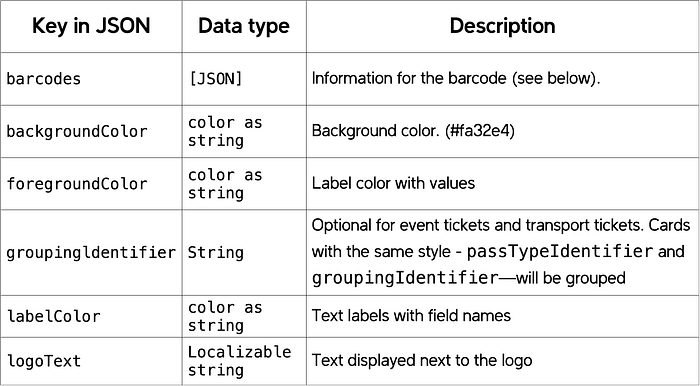
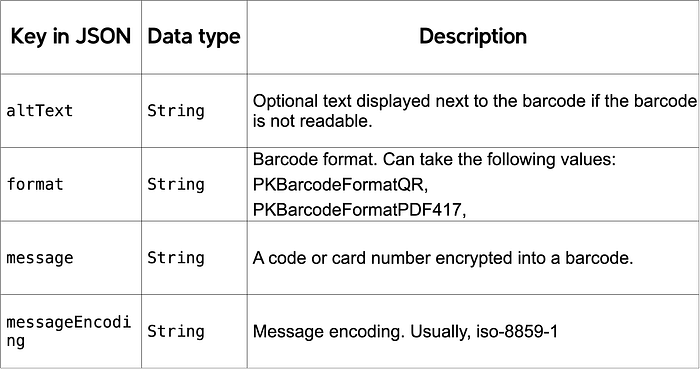
Barcode
The most important element of the card. The identification number of the card (for example, a physical card number or ticket number) is contained in it. It is important that the scanner or any other tool can read the codes using the correct encoding.
Location
These keys are responsible for the location within which the card can be used.
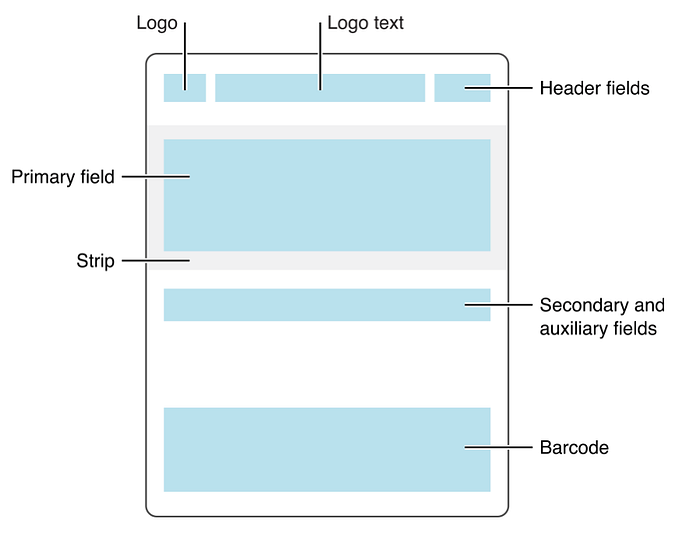
Back side
On the back of the information section, you can place additional information: conditions of use, auto-renewal policy, contact information, and a link to the application which the card is associated. The figure below shows the correspondence between the fields in pass.json and the appearance of the back of the card. If there are links, phone numbers, etc. in the value field, they will be highlighted automatically.
Creating the card. Part 2
So, the images are ready, the pass.json is generated, so now all we have to do is put it all together. To do this, fill in manifest.json (see Table 1), where we need to include all the images and pass.json. It looks something like this:
. . . . . .“pass.json” = 303c753abc39aa732ec74643d6db28348fe8a823;“strip.png” = 736d01f84cb73d06e8a9932e43076d68f19461ff;“strip@2x.png” = 468fa7bc93e6b55342b56fda09bdce7c829d7d46;. . . . . .
At this point, you do not need to change anything, because the SHA will not be correct; in case of changes you need to generate the SHA again.
Next, you need to create a Pass Type ID in the developer account and generate a certificate for it. The procedure should be more or less familiar if you have created, for example, Provisioning profiles before.
Next, go to the Keychain and export the Apple Worldwide Developer Relation Certificate (WWDR) as a .pem.
From there, export the created Pass Type ID as .p12. At this point, the Keychain will prompt you to enter the password for the certificate. It is not necessary to enter your password. Note that all further actions should be performed in the same folder where manifest.json, pass.json and images should already be located.
Now, you need to generate a signature, which will be used to sign the archive. First, export the Pass Type ID and its key as a .pem.
openssl pkcs12 -in certificate.p12 -clcerts -nokeys -out passcertificate.pem -passin pass: your_passwordAnd
openssl pkcs12 -in certificates.p12 -nocerts -out passkey.pem -passin pass: -passout pass:new_passwordNow, we are ready to generate the signature. Let’s use the command:
openssl smime -binary -sign -certfile WWDR.pem -signer passcertificate.pem -inkey passkey.pem -in manifest.json -out signature -outform DER -passin pass:password_from_previous_commandSo, we have everything ready, the only thing left is to assemble the archive — use the command:
zip -r nameOfPass.pkpass manifest.json pass.json signature logo.png logo@2x.png logo@3x.png icon.png icon@2x.png icon@3x.pngNote that all files where you want to include the data archive for the card (.pkpass) must be listed here. The result will be the .pkpass file that you can open on your computer. You will see a preview of the card; its appearance may differ from what it looks on the phone. But there is also an easier way to do this! Apple offers a signpass utility (Apple Wallet sample materials) that takes care of all the SHA calculations (you don’t need to create the manifest.json file yourself) and creating signatures. To use it, you need to build a project and place the signpass file in the folder with all the necessary resources.
In general, the structure should look something like this:
Next, execute the command:
./signpass -p walletWallet is the name of the folder where all the resources are located. The output is the wallet.pkpass file. You can view its contents by unzipping wallet.pkpass.
unzip wallet.pkpassCreating a card in real world
As and iOS developer you should all needed resources to your backed colleagues:
- WWDR certificate
- Pass Type ID and a password for it
- Images
Also you should assist them to achieve desired card structure (for instance you could give them a link to this article ;) )
Integration with the app
In order for the app to be able to add cards to Wallet, you should enable this feature in the App ID and also enable this feature in Capabilities in the project.
This is necessary if you want all Wallet features to work correctly. Otherwise, it will not be possible to read cards from Wallet and, for example, it will not be possible to know whether your card is added or not. It is also important to note that the team id in pass.json must match the team id, or you will have to add them manually to pass.json and to fix the situation, but I have not checked this.
Adding a card
Adding cards is very easy:
guard let passPath = Bundle.main.path(forResource: “wallet”, ofType: “pkpass”) else { return }let error: ErrorPointer = ErrorPointer(nilLiteral: ())guard let passData = NSData(contentsOfFile: passPath) else { return }let pass = PKPass(data: passData as Data, error: error)let passLibrary = PKPassLibrary()passLibrary.addPasses([pass]) { (status) inprint(passLibrary.containsPass(pass))}
However, again, you will need to download the .pkpass file from your server more often than not. It’s worth noting that PassKit generates fairly readable errors, so you can easily figure out what was done wrong.
Getting information about added cards
To get information about Wallet cards that are associated with your application, you need to refer to the PKPassLibrary object.
let passLibrary = PKPassLibrary()let passes = passLibrary.passes()
This way you can see if the card is added or not, as well as update the interface. In addition, cards can be updated and deleted via PKPassLibrary. It is also possible to update cards via web services, but we will not consider this option in this article.
Check for uniqueness
As a rule, the card is tied to an account in your service, and the application will most likely have to somehow determine whether the card belongs to the current user. I suggest doing it via serialNumber. For example, to set the user id or the card’s number as serialNumber.
Testing
Apple offers samples of pkpass for different types. Apple Wallet samples To see what the card looks like, you can add pkpass to the project (see Adding a card). The process of adding/deleting has already been discussed above. I just want to remind that the application will not see the already added cards, if the card for Wallet was created in one developer account, but the development itself was conducted from another account (relevant for outsourcing companies). At the same time, you can add cards without any problems. You can use any QR code scanner to check whether the information in the barcode is encoded correctly. And it is definitely necessary to check the correctness of work with the real scanner.
Conclusion
This article covered the process of creating and designing a card, as well as the process of integration with the application and the problems that may arise. I specifically haven’t mentioned integration with web services and card updates. I hope to do this in the next article.